

RealTime Reports will now allow schools/districts to control which reports are available to individual users. The new Visibility Settings will allow Administrators to control access to reports from both the Category and Individual Report Level. With the new Settings function schools/districts can now:
- Disable an entire Report Category for all users.
- Limit access to an entire Report Category to specific roles.
- Disable an individual Report for all users.
- Further limit access to individual Reports to specific roles.
.gif?width=1280&height=720&name=New%20Table%20Layout%20(1).gif)
Accessing the “Settings” Options on the Dashboard
RealTime Reports “Settings” can be enabled for a SysAdmin by creating a role and giving any number of users the ability to access it. (Note: this is the same role used by our Data Validation customers to access the Control Panel. If already set up, you can skip to step 3 below.)
To enable:
- Create a new role on your PowerSchool server by navigating to:
System > Security > Roles Administration > User Access > New - Name the new role: Level Data Apps Administrator* and click submit.
*This role must be spelled exactly as shown above and is case sensitive. All other settings can be left as default.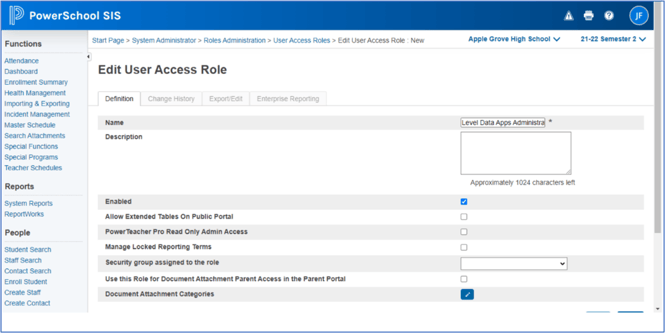
- From the Start Page, select a staff member who should be granted permissions to access to “Settings” for RealTime Reports and navigate to their Security Settings page.
- Under the Admin Access and Roles tab, add the newly created Level Data Apps Administrator role to all schools where the staff member should have access.
- Submit the role update changes when complete.

Note: Users assigned this role will need to sign out of PowerSchool, close their browser, and then re-open their browser to access the control panel.
Working with "Settings"
(*Note: The “Settings” icons will only appear for those users that are assigned the Level Data Apps Administrator role for the school environment from which they are accessing RealTime Reports.)
-
Disable an Entire Category
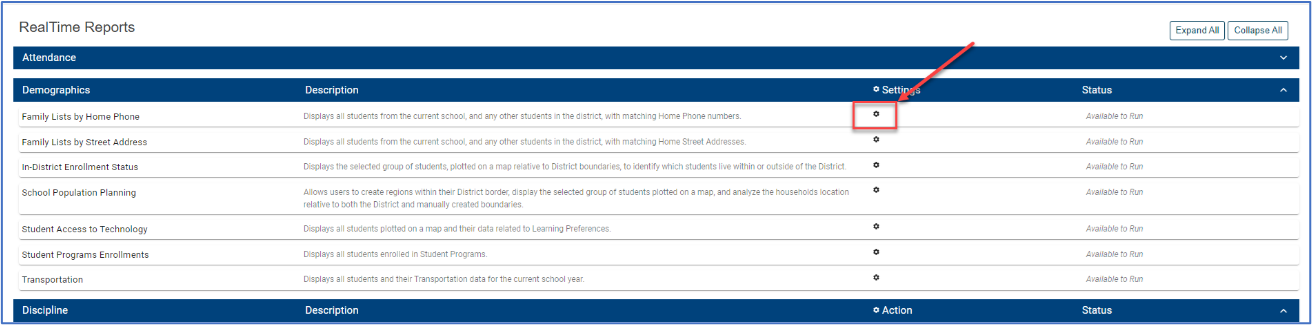
- To Disable all reports within a Category, Click the Gear Icon to the left of “Settings” on the Category header.
.png?width=665&height=220&name=Untitled%20design%20(51).png)
- Slide the “Category Enabled” button to the left.
.png?width=665&height=223&name=Untitled%20design%20(52).png)
- Click Submit to save the changes.
When an entire category has been disabled what will we see?
Level Data Apps Admin – The Admin will continue to see all reports, however, they will not be able to access any of the individual reports as they have been locked/disabled, for all.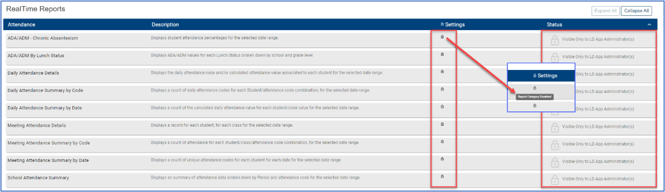
Basic User – If a category has been disabled, no reports will be displayed.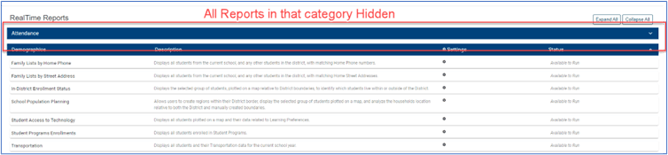
-
Set Category Visibility by Role
- To limit all reports within a Category to specific roles, click the gear Icon to the left of “Settings” on the Category header.
.png?width=1270&height=420&name=Untitled%20design%20(51).png)
- From the Visibility dialogue, check the box to the left of each role that should be able to access reports within the category.
- Click Submit to save the changes.
- As with disabling a category, the Level Data Apps Administrator will continue to see all reports, allowing them to manage visibility as needed.
- For normal users, only users associated to the selected roles would see reports within the category.
-
Disable a Report for All Users
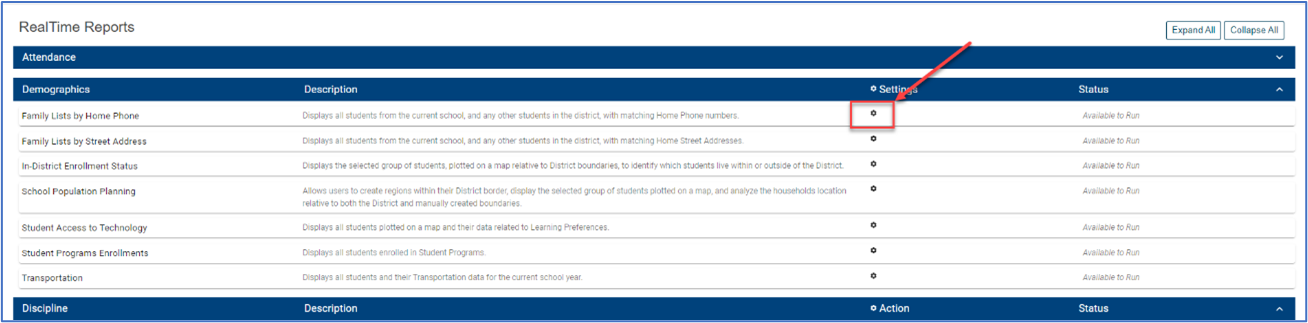
- To Disable all reports within a Category, Click the Gear Icon to the left of “Settings” on the Category header.
- Slide the “Report Enabled” button to the left.
.png?width=1270&height=490&name=Untitled%20design%20(53).png)
- Click Submit to save the changes.
When individual reports have been disabled what will we see?
Level Data Apps Admin – The Admin will continue to see all reports, run reports, (so long as their role is one of those permitted access), and modify the Visibility “Settings” if needed.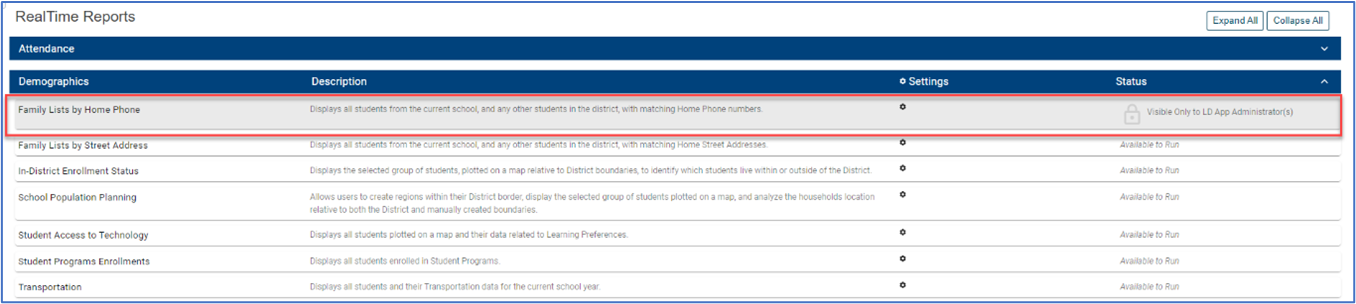
Basic User – If an individual report is only available to select roles only users associated with those roles would see the report.
-
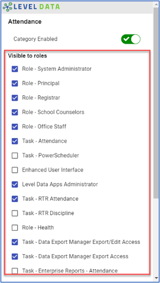
Set Individual Report Visibility
- To limit visibility of an individual report, for all users, Click the gear Icon from the “Settings” column for the selected report.
(Note: If, when accessing the Report Settings dialogue, no Roles appear, close the dialogue window, click on the Settings gear for the Category in which that report appears and click submit at the bottom of the dialogue window. Once submitted, click on the Settings gear for the individual report. Any Role that was checked for the Category will then display for the report.) - From the Visibility dialogue, check the box to the left of each role that should be able to access the report.

- Click Submit to save the changes.
- As with disabling a category, the Level Data Apps Administrator will continue to see all reports, allowing them to manage visibility as needed.
- For normal users, only users associated to the Selected roles would see reports within the category.